von patrick2010 » Fr 18. Mai 2018, 17:09
Hallo,
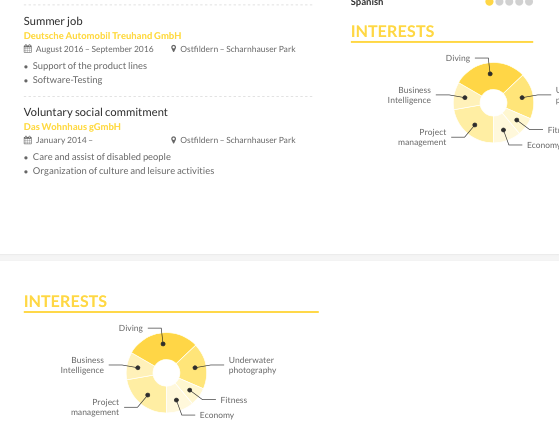
ich habe mir ein Lebenslauf über Latex kreiert. Mehr oder weniger den Code eines bestehendes Lebenslaufs entnommen, da ich ein Neuling bin. Das Kreisdiagramm war vorab auf der linken Seite.
Nun wollte ich das Kreisdiagramm auf die rechte Seite verschieben und es wird nicht mehr richtig angezeigt. Wie kann ich es anpassen, so dass man das ganze Kreisdiagramm sieht? ( Siehe angehängtes Foto)
\newcommand{\wheelchart}[3]{%
	\begingroup\centering
    \def\innerradius{#2}%
    \def\outerradius{#1}%
    % Calculate total
    \pgfmathsetmacro{\totalnum}{0}%
    \foreach \value/\colour/\name in {#3} {%
        \pgfmathparse{\value+\totalnum}%
        \global\let\totalnum=\pgfmathresult%
    }%
    \begin{tikzpicture}\centering

      % Calculate the thickness and the middle line of the wheel
      \pgfmathsetmacro{\wheelwidth}{\outerradius-\innerradius}
      \pgfmathsetmacro{\midradius}{(\outerradius+\innerradius)/2}

      % Rotate so we start from the top
      \begin{scope}[rotate=-90]

      % Loop through each value set. \cumnum keeps track of where we are in the wheel
      \pgfmathsetmacro{\cumnum}{0}
      \foreach \value/\width/\colour/\name in {#3} {
            \pgfmathsetmacro{\newcumnum}{\cumnum + \value/\totalnum*360}

            % Calculate the percent value
            \pgfmathsetmacro{\percentage}{\value/\totalnum*100}
            % Calculate the mid angle of the colour segments to place the labels
            \pgfmathsetmacro{\midangle}{-(\cumnum+\newcumnum)/2}

            % This is necessary for the labels to align nicely
            \pgfmathparse{
               (-\midangle>180?"west":"east")
            } \edef\textanchor{\pgfmathresult}
            \pgfmathparse{
               (-\midangle>180?"flush left":"flush right")
            } \edef\textalign{\pgfmathresult}
            \pgfmathsetmacro\labelshiftdir{1-2*(-\midangle<180)}

            % Draw the color segments. Somehow, the \midrow units got lost, so we add 'pt' at the end. Not nice...
            \filldraw[draw=white,fill=\colour] (-\cumnum:\outerradius) arc (-\cumnum:-(\newcumnum):\outerradius) --
            (-\newcumnum:\innerradius) arc (-\newcumnum:-(\cumnum):\innerradius) -- cycle;

            % Draw the data labels
            \draw  [*-,thin,emphasis] node [append after command={(\midangle:\midradius pt) -- (\midangle:\outerradius + 1ex) -- (\tikzlastnode)}] at (\midangle:\outerradius + 1ex) [xshift=\labelshiftdir*0.5cm,inner sep=1ex, outer sep=0pt, text width=\width,anchor=\textanchor,align=\textalign,font=\small,text=body]{\name};
            % Set the old cumulated angle to the new value
            \global\let\cumnum=\newcumnum
        }
      \end{scope}
%      \draw[gray] (0,0) circle (\outerradius) circle (\innerradius);
    \end{tikzpicture}\centering
     \endgroup\centering


}
- Dateianhänge
-
- Screen Shot 2018-05-18 at 17.00.39.png (51.02 KiB) 1354 mal betrachtet
Hallo,
ich habe mir ein Lebenslauf über Latex kreiert. Mehr oder weniger den Code eines bestehendes Lebenslaufs entnommen, da ich ein Neuling bin. Das Kreisdiagramm war vorab auf der linken Seite.
Nun wollte ich das Kreisdiagramm auf die rechte Seite verschieben und es wird nicht mehr richtig angezeigt. Wie kann ich es anpassen, so dass man das ganze Kreisdiagramm sieht? ( Siehe angehängtes Foto)
[code]
\newcommand{\wheelchart}[3]{%
\begingroup\centering
\def\innerradius{#2}%
\def\outerradius{#1}%
% Calculate total
\pgfmathsetmacro{\totalnum}{0}%
\foreach \value/\colour/\name in {#3} {%
\pgfmathparse{\value+\totalnum}%
\global\let\totalnum=\pgfmathresult%
}%
\begin{tikzpicture}\centering
% Calculate the thickness and the middle line of the wheel
\pgfmathsetmacro{\wheelwidth}{\outerradius-\innerradius}
\pgfmathsetmacro{\midradius}{(\outerradius+\innerradius)/2}
% Rotate so we start from the top
\begin{scope}[rotate=-90]
% Loop through each value set. \cumnum keeps track of where we are in the wheel
\pgfmathsetmacro{\cumnum}{0}
\foreach \value/\width/\colour/\name in {#3} {
\pgfmathsetmacro{\newcumnum}{\cumnum + \value/\totalnum*360}
% Calculate the percent value
\pgfmathsetmacro{\percentage}{\value/\totalnum*100}
% Calculate the mid angle of the colour segments to place the labels
\pgfmathsetmacro{\midangle}{-(\cumnum+\newcumnum)/2}
% This is necessary for the labels to align nicely
\pgfmathparse{
(-\midangle>180?"west":"east")
} \edef\textanchor{\pgfmathresult}
\pgfmathparse{
(-\midangle>180?"flush left":"flush right")
} \edef\textalign{\pgfmathresult}
\pgfmathsetmacro\labelshiftdir{1-2*(-\midangle<180)}
% Draw the color segments. Somehow, the \midrow units got lost, so we add 'pt' at the end. Not nice...
\filldraw[draw=white,fill=\colour] (-\cumnum:\outerradius) arc (-\cumnum:-(\newcumnum):\outerradius) --
(-\newcumnum:\innerradius) arc (-\newcumnum:-(\cumnum):\innerradius) -- cycle;
% Draw the data labels
\draw [*-,thin,emphasis] node [append after command={(\midangle:\midradius pt) -- (\midangle:\outerradius + 1ex) -- (\tikzlastnode)}] at (\midangle:\outerradius + 1ex) [xshift=\labelshiftdir*0.5cm,inner sep=1ex, outer sep=0pt, text width=\width,anchor=\textanchor,align=\textalign,font=\small,text=body]{\name};
% Set the old cumulated angle to the new value
\global\let\cumnum=\newcumnum
}
\end{scope}
% \draw[gray] (0,0) circle (\outerradius) circle (\innerradius);
\end{tikzpicture}\centering
\endgroup\centering
}[/code]