von StefanB » Sa 10. Okt 2015, 18:13
Hallo,
ich verwende die exam-class (
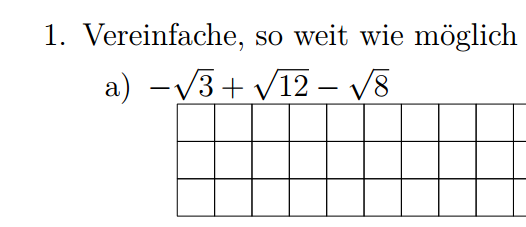
https://www.ctan.org/tex-archive/macros ... ntrib/exam) und hätte gerne, dass wenn ich Karos einfüge, dass sie linksbündig mit dem "a)" beginnen. Zur Zeit wird es ca 1cm eingerückt, siehe Bild.
\documentclass{exam}
\usepackage{enumerate}
\usepackage{multienum}
\usepackage[inline,shortlabels]{enumitem}
\usepackage{pgf,tikz}

\usetikzlibrary{arrows}
%\printanswers
\renewcommand*{\partlabel}{\thepartno)}

\begin{document}
\begin{questions}
\question
Vereinfache, so weit wie möglich.
\begin{parts}
\part $-\sqrt{3}+\sqrt{12}-\sqrt{8}$
\fillwithgrid{1,5cm}

\end{parts}

\end{questions}
\end{document}
Hier der passende Code der exam.cls
%--------------------------------------------------------------------
%                            \fillwithgrid


% \fillwithgrid is similar to \fillwithlines, except that it
% fills the space with a grid.

% \fillwithgrid takes one argument, which is either a length or \fill
% or \stretch{number}, and it fills that much vertical space with a
% grid that runs the length of the current line.  That is, it extends
% from the current left margin (which depends on whether we're in a
% question, part, subpart, or subsubpart) to the right margin.
%
% The default grid size and grid line thickness were set by the
% commands
%
% \setlength{\gridsize}{5mm}
% \setlength{\gridlinewidth}{0.1pt}
%
% You can change either or both of those by giving new \setlength
% commands.  The period of the grid is \gridsize (both horizontally
% and vertically).  That is, the horizontal distance from the left
% edge of one vertical line to the left edge of the next vertical line
% is \gridsize, as is the vertical distance from the top edge of one
% horizontal line to the top edge of the next horizontal line.  Thus,
% each square has outer side length equal to \gridsize+\gridlinewidth.

% By default, the created grids are in black.  However, if you give the
% commands
%
% \usepackage{color}
% \colorgrids
%
% then the grids will be in color, by default a light gray.  That
% default color was defined by the command
%
% \definecolor{GridColor}{gray}{0.8}
%
% You can change the color by redefining the color GridColor by giving
% a new \definecolor command.

\newif\if@colorgrids
\newcommand\colorgrids{%
  \@ifundefined{definecolor}
  {%
    \ClassError{exam}{%
      You must load the color package with the command\MessageBreak
      \space\space\protect\usepackage{color}\MessageBreak
      in order to use the command \protect\colorgrids
      }{%
      This command makes use of the package color.sty,\MessageBreak
      and so you have to load color.sty before your\MessageBreak
      \protect\begin{document} command.\MessageBreak
      }%
  }%
  {%
    \definecolor{GridColor}{gray}{0.8}
    \@colorgridstrue
  }%
}% \colorgrids
\newcommand\nocolorgrids{\@colorgridsfalse}
\nocolorgrids

\newlength\gridsize
\newlength\gridlinewidth
\setlength{\gridsize}{5mm}
\setlength{\gridlinewidth}{0.1pt}

\def\fillwithgrid#1{%
  \begingroup
  \ifhmode
    \par
  \fi
  \hrule height \z@
  \nobreak

  % We first set box0 equal to an \hbox which, when printed, is a
  % square with width and height equal to \gridsize+\gridlinewidth,
  % but which has
  % width equal to \gridsize,
  % height equal to \gridsize, and
  % depth equal to 0pt.
  % When we put multiple copies of it together using \leaders or
  % \cleaders, the right edge will coincide with the left edge of the
  % next box and the bottom edge will coincide with the top edge of
  % the box below it.
  \setlength{\@tempdima}{\gridsize}
  \addtolength{\@tempdima}{\gridlinewidth}
  \setlength{\@tempdimb}{\gridsize}
  \addtolength{\@tempdimb}{-\gridlinewidth}
  \setbox0=\hbox{%
    \rlap{\vrule height \gridsize depth \gridlinewidth width \gridlinewidth}%
    \rlap{\vrule height \gridsize depth -\@tempdimb width \@tempdima}%
    \vrule height 0pt depth \gridlinewidth width \@tempdima
    \llap{\vrule height \gridsize depth \gridlinewidth width \gridlinewidth}%
  }%
  \wd0=\gridsize
  \dp0=0pt
  % Now we set box1 equal to an \hbox containing a single line of
  % copies of box0.  We use \leaders (instead of \cleaders) so that
  % if we use it twice on a page, once with a question and once
  % with a part, the boxes will line up vertically.  We add a kern of
  % \gridlinewidth at the right because the rightmost vertical line
  % appears to the right of where the \leaders command thinks that it
  % appears.
  \setbox1=\hbox to \textwidth{%
    \color@begingroup
    \if@colorgrids
      \color{GridColor}%
    \fi
    \hskip \@totalleftmargin \leaders\copy0\hfil \kern\gridlinewidth
    \color@endgroup
  }%
  % Finally: We create the grid, using \cleaders: We use \cleaders
  % (rather than \leaders) so that a given vertical space will always
  % produce the same number of lines no matter where on the page it
  % happens to start.  We add a kern of \gridlinewidth because the
  % bottommost horizontal line appears below where the \cleaders
  % command thinks that it appears.
  \cleaders \copy1 \vskip #1 \kern \gridlinewidth \hbox{}%
  \endgroup
}% fillwithgrid
- Dateianhänge
-
- rand.PNG (15.83 KiB) 2291 mal betrachtet
Hallo,
ich verwende die exam-class ([url]https://www.ctan.org/tex-archive/macros/latex/contrib/exam[/url]) und hätte gerne, dass wenn ich Karos einfüge, dass sie linksbündig mit dem "a)" beginnen. Zur Zeit wird es ca 1cm eingerückt, siehe Bild.
[code]
\documentclass{exam}
\usepackage{enumerate}
\usepackage{multienum}
\usepackage[inline,shortlabels]{enumitem}
\usepackage{pgf,tikz}
\usetikzlibrary{arrows}
%\printanswers
\renewcommand*{\partlabel}{\thepartno)}
\begin{document}
\begin{questions}
\question
Vereinfache, so weit wie möglich.
\begin{parts}
\part $-\sqrt{3}+\sqrt{12}-\sqrt{8}$
\fillwithgrid{1,5cm}
\end{parts}
\end{questions}
\end{document}
[/code]
Hier der passende Code der exam.cls
[code]
%--------------------------------------------------------------------
% \fillwithgrid
% \fillwithgrid is similar to \fillwithlines, except that it
% fills the space with a grid.
% \fillwithgrid takes one argument, which is either a length or \fill
% or \stretch{number}, and it fills that much vertical space with a
% grid that runs the length of the current line. That is, it extends
% from the current left margin (which depends on whether we're in a
% question, part, subpart, or subsubpart) to the right margin.
%
% The default grid size and grid line thickness were set by the
% commands
%
% \setlength{\gridsize}{5mm}
% \setlength{\gridlinewidth}{0.1pt}
%
% You can change either or both of those by giving new \setlength
% commands. The period of the grid is \gridsize (both horizontally
% and vertically). That is, the horizontal distance from the left
% edge of one vertical line to the left edge of the next vertical line
% is \gridsize, as is the vertical distance from the top edge of one
% horizontal line to the top edge of the next horizontal line. Thus,
% each square has outer side length equal to \gridsize+\gridlinewidth.
% By default, the created grids are in black. However, if you give the
% commands
%
% \usepackage{color}
% \colorgrids
%
% then the grids will be in color, by default a light gray. That
% default color was defined by the command
%
% \definecolor{GridColor}{gray}{0.8}
%
% You can change the color by redefining the color GridColor by giving
% a new \definecolor command.
\newif\if@colorgrids
\newcommand\colorgrids{%
\@ifundefined{definecolor}
{%
\ClassError{exam}{%
You must load the color package with the command\MessageBreak
\space\space\protect\usepackage{color}\MessageBreak
in order to use the command \protect\colorgrids
}{%
This command makes use of the package color.sty,\MessageBreak
and so you have to load color.sty before your\MessageBreak
\protect\begin{document} command.\MessageBreak
}%
}%
{%
\definecolor{GridColor}{gray}{0.8}
\@colorgridstrue
}%
}% \colorgrids
\newcommand\nocolorgrids{\@colorgridsfalse}
\nocolorgrids
\newlength\gridsize
\newlength\gridlinewidth
\setlength{\gridsize}{5mm}
\setlength{\gridlinewidth}{0.1pt}
\def\fillwithgrid#1{%
\begingroup
\ifhmode
\par
\fi
\hrule height \z@
\nobreak
% We first set box0 equal to an \hbox which, when printed, is a
% square with width and height equal to \gridsize+\gridlinewidth,
% but which has
% width equal to \gridsize,
% height equal to \gridsize, and
% depth equal to 0pt.
% When we put multiple copies of it together using \leaders or
% \cleaders, the right edge will coincide with the left edge of the
% next box and the bottom edge will coincide with the top edge of
% the box below it.
\setlength{\@tempdima}{\gridsize}
\addtolength{\@tempdima}{\gridlinewidth}
\setlength{\@tempdimb}{\gridsize}
\addtolength{\@tempdimb}{-\gridlinewidth}
\setbox0=\hbox{%
\rlap{\vrule height \gridsize depth \gridlinewidth width \gridlinewidth}%
\rlap{\vrule height \gridsize depth -\@tempdimb width \@tempdima}%
\vrule height 0pt depth \gridlinewidth width \@tempdima
\llap{\vrule height \gridsize depth \gridlinewidth width \gridlinewidth}%
}%
\wd0=\gridsize
\dp0=0pt
% Now we set box1 equal to an \hbox containing a single line of
% copies of box0. We use \leaders (instead of \cleaders) so that
% if we use it twice on a page, once with a question and once
% with a part, the boxes will line up vertically. We add a kern of
% \gridlinewidth at the right because the rightmost vertical line
% appears to the right of where the \leaders command thinks that it
% appears.
\setbox1=\hbox to \textwidth{%
\color@begingroup
\if@colorgrids
\color{GridColor}%
\fi
\hskip \@totalleftmargin \leaders\copy0\hfil \kern\gridlinewidth
\color@endgroup
}%
% Finally: We create the grid, using \cleaders: We use \cleaders
% (rather than \leaders) so that a given vertical space will always
% produce the same number of lines no matter where on the page it
% happens to start. We add a kern of \gridlinewidth because the
% bottommost horizontal line appears below where the \cleaders
% command thinks that it appears.
\cleaders \copy1 \vskip #1 \kern \gridlinewidth \hbox{}%
\endgroup
}% fillwithgrid
[/code]